Getting started with AWS can be extremely intimidating. From horror stories of large surprise bills, to the seemingly endless list of available services, nothing about using AWS for the first time is a comfortable experience.
In this newsletter we will go step by step through setting up AWS to be secure, organized, and with an understanding of when and where costs will come from. We’ll attempt to follow as many best-practices as possible, and use industry standard strategies like defining our infrastructure as code.
My hope is that this will help others to get started using AWS with less anxiety, and greater success, whether you are creating something on their own or as part of a larger group.
Creating an account
Let’s get started (from scratch)! The first step of course is to actually create an AWS account. This is fairly straightforward, and you can either go for it on your own or follow a simple guide like this from AWS.
You’ll have to provide a payment method even if you plan to stay within the AWS Free Tier. Don’t worry, we’ll help make sure you do!
Another thing to put consideration into is the email that you use for your account. Use something secure as this email account will play an important part in being able to access your AWS account, with the ability to reset credentials.
If you are part of an organization, consider using a group like admins@yourcompany.com so that an individual leaving the company does not result in loss of access to the email address. If you’re operating as an individual, consider using a new sibling address, like yourname+awsroot@gmail.com to distinguish this root account from others you may later create.
Securing the account
While you might be tempted to get started with something more exciting like talking to satellites, the best thing you can do first is to start properly securing access to your account. You’ll be thankful for it later.
Enabling root account MFA
The AWS root account is special. It has unrestricted access to your account. You should take as much care as possible to protect its access. A good, secure password is important, but you should also enable MFA. This is a simple, but easily skipped step that should be considered mandatory. You can follow the docs here to enable MFA.
AWS also provides this page with best practices for securing your root user’s credentials.
Creating your first IAM user
The nature of the AWS root account is such that it’s best to use it as little as possible. Only a few tasks require this account. All other interaction is best done with more limited access credentials.
Managing AWS access a vast topic with many strategies depending on your requirements. For now we’ll start as simple as possible by just creating a single IAM user that we can use for further administration.
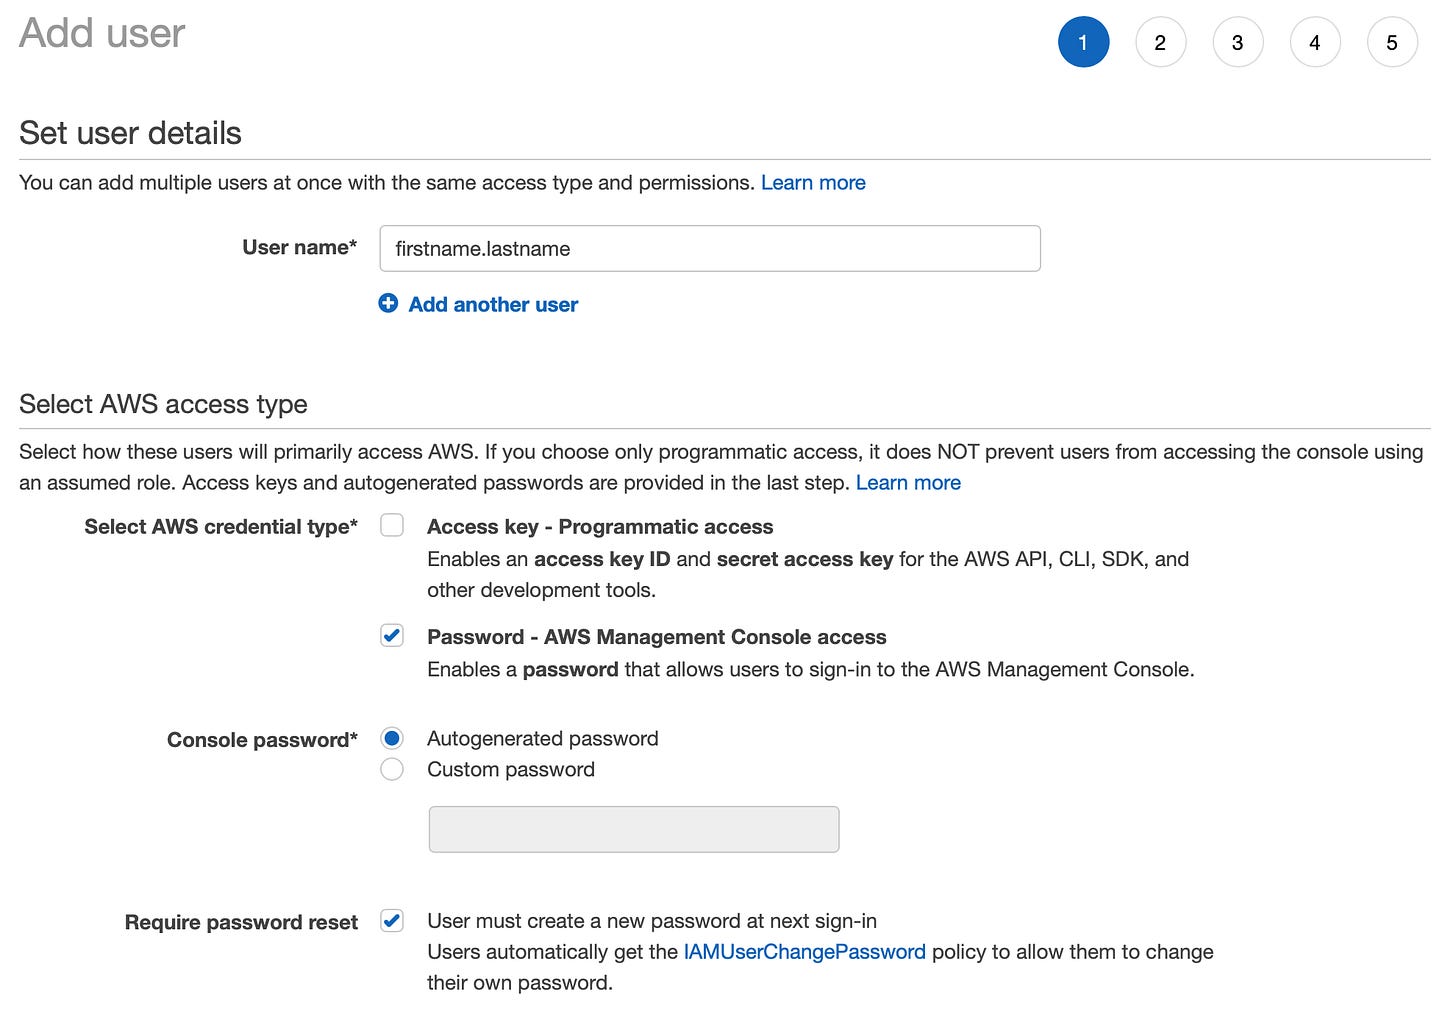
While logged in as your root user, navigate to IAM → Users → Add User (or go directly there).
Fill out the details. We are doing just a password credential to access via the web console for now. We’ll create a programmatic access key later.
Either provide a secure password now since the IAM user is for yourself, or if you select autogenerated, also select to require a password reset.
When setting permissions, just attach “Administrator Access” for now. This is broad, but we can narrow it down later. For now we are just bootstrapping access so that we can begin to provision infrastructure from code.
Finish creating the IAM user. You do not need to add any tags yet.
The success screen will provide you the information to sign into your account with this new IAM user.
Baby steps
Congrats! You’ve successfully created an AWS account, secured the root user, and created your first IAM user to begin administering it! In the next post we will enable programmatic access, and start to put all of our current and future configuration into Infrastructure as Code (IaC).


